Showing posts with label Art. Show all posts

Sunday, October 28, 2012

{Playing Through Autumn Day 26} Painted Pumpkins

There are so many ways to play with pumpkins - rolling them, stacking them, carving them, of course! - but did you know there are also so many ways to get creative with them? We recently painted some miniature pumpkins and gourds with purple paint - it was a blast and I was excited to see where the tot would take things. As usual, she blew me away with her level of engagement. And very unusual for us, she didn't even make that big of a mess!


I actually didn't have any purple paint on hand, so I mixed together blue and red until I got a nice deep shade of purple. It was quick and easy and gave us a nice fall hue to glaze over the orange of the pumpkins.


The tot got right to work and loved every minute of it! Pretty soon she had those gourds covered in purple paint and we had a lovely addition to our autumn decor!


Thursday, October 25, 2012

{Playing Through Autumn Day 25} Leaf Collecting & Pressing

We're going on a leaf hunt! We're gonna find some yellow ones! And boy...did we ever! I have been looking forward to collecting leaves with the tot since last autumn, and this year we really hit the jackpot!


We headed out to our favorite park on a perfect, sunny fall day. I have to brag on my kid just a little bit - she is a pro at finding gorgeous fall leaves! Pretty soon our bag was filling right up!


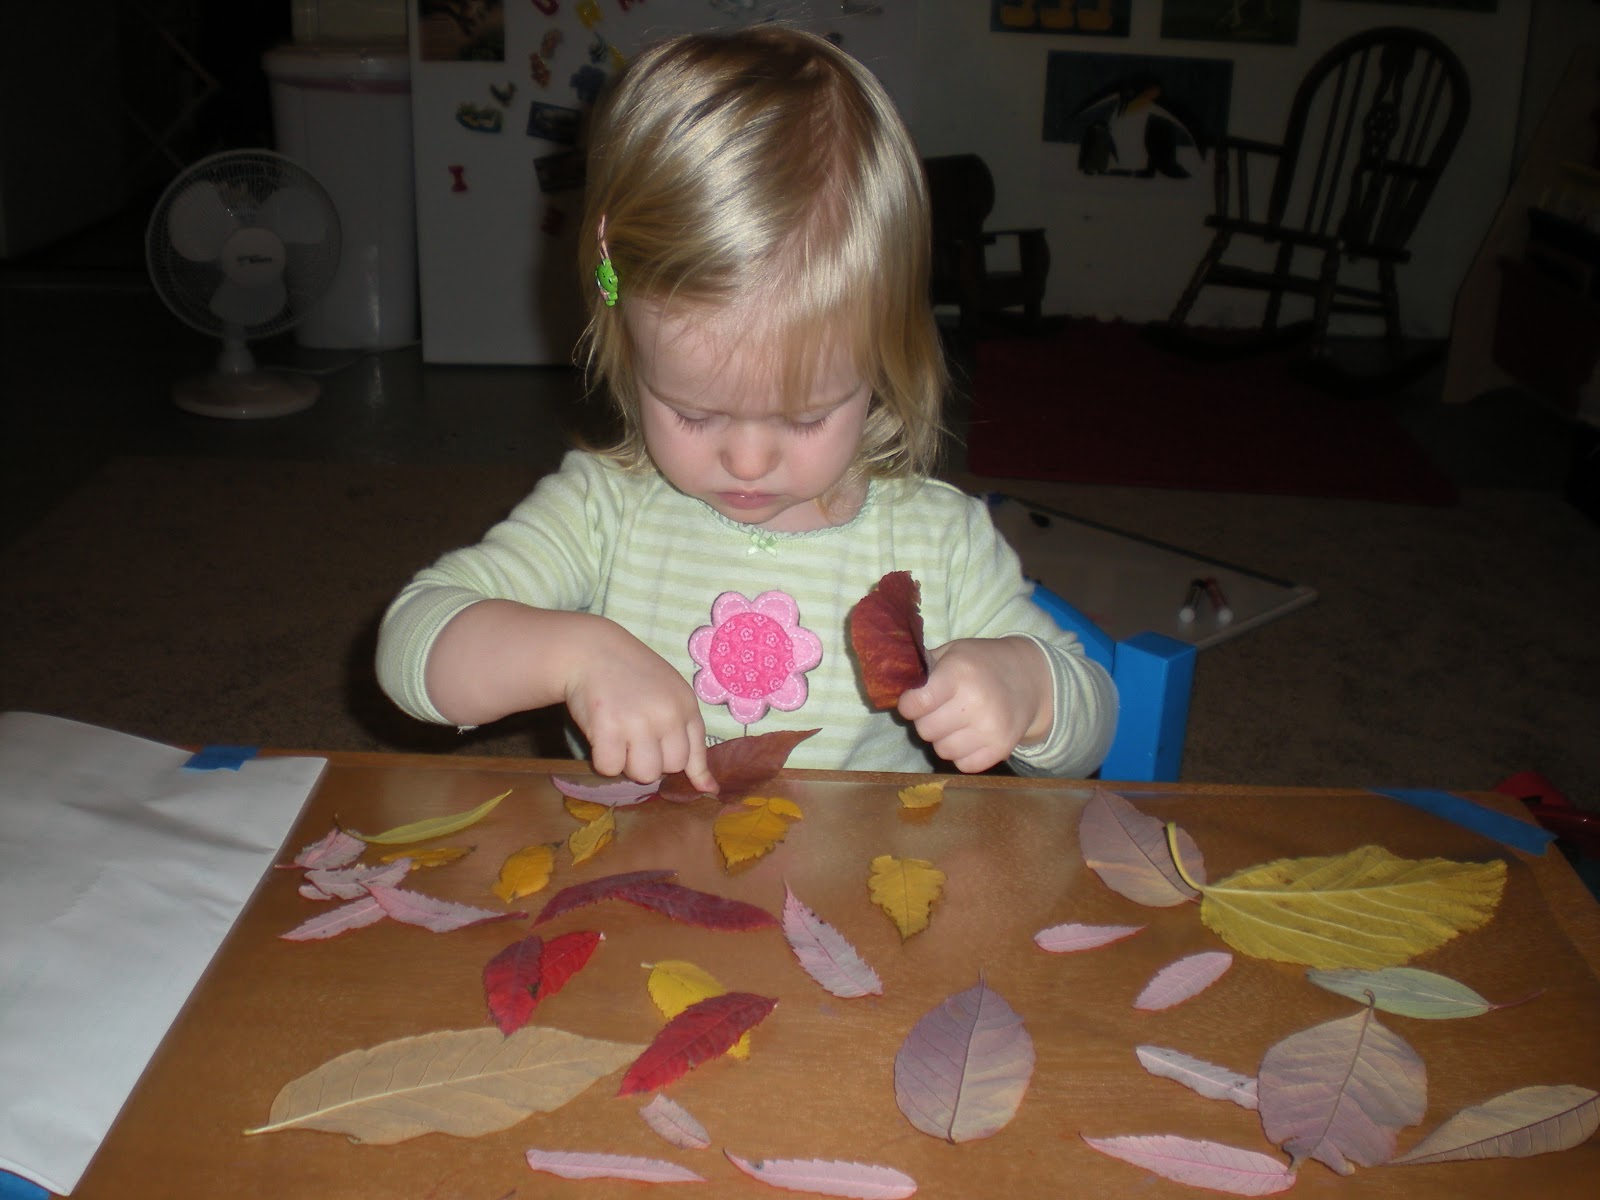
Once our bag was filled to the brim, we headed home to check out our findings. We had quite the stash!


Next, we laid out a huge piece of contact paper, sticky side up, for pressing our leaves. 


Helpful hint: Determine how much contact paper you want and cut it from the roll. Then, fold it in half and only take the backing from one half of the paper. Tape down the whole thing and go to town with the leaves. When you're finished, remove the backing from the other side and fold it over. This makes it so much easier to line up, and it helps to ensure a good seal. 

We had collected so many leaves that we ended up doing two huge sheets of contact paper and having enough left over to get a nice little sensory basket going. The tot was so proud of her creation that she showed it off to anyone who would look. I thought it was so beautiful that I ended up hanging it up in the living room of our house, where it can properly be admired by all who come to call.

Wednesday, October 24, 2012

{Playing Through Autumn Day 24} Indian Corn Prints

If you have read this blog even just a little bit, you've undoubtedly picked up on the fact that I adore doing art projects with toddlers - the messier the better! I also love incorporating unconventional tools into everyday art experiences, and luckily I have a kid who shares my enthusiasm. We recently had a blast painting with Indian corn - a little touch of autumn incorporated into an experience we have quite often. Needless to say, we made a huge mess - and had a ton of fun in the process!


I started off by hacking a large piece of decorative Indian corn into two pieces, which turned out to be a lot more difficult than I'd imagined. Duly noted for the next go around! Then I used those handy little corn holder thingies that you use for eating corn on the cob to create handles for L to hold onto while she was painting. Add some autumn colored paint to a pie tin and we were ready to rock and roll!


After a quick tutorial on dipping the corn and rolling it on the paper, L was set to go. It didn't take her long to figure out how to roll the corn across the paper, all the while telling me about the fact that the corn was now orange. Clever girl!


The girl has mad skills! The technique was so much easier with the corn handle thingies than in the past when I've tried to have students do it by holding onto the ends of the cob. It was very satisfying listening to the clunk of the corn and the splatter of the paint on the paper - a feast for the senses!


The finished masterpiece was absolutely gorgeous! And don't let the photos fool you...by the time we were finished, L's shirt was completely covered in paint! I've never been one to let a little mess scare me away from an awesome art experience, which is a good thing, because the paint also seeped through her shirt and turned her belly orange and brown! How festive!

Are you incorporating seasonal items into your kiddo's play experiences? What have been some favorite activities?

Wednesday, October 10, 2012

{Playing Through Autumn Day 20} Ziploc Bag Painting

We absolutely ADORE painting activities in our house, and more often than not painting activities turn into sensory activities, with L slathering paint on every available surface of skin she can find. Generally this isn't a problem, but when I'm trying out ideas for my classroom on my beloved tot, I have to be a bit more clever in the mess department. Recently I tried a color mixing/painting activity with my kiddos at school (originally designed for a child with some sensory issues, who loves art but hates to be messy) inside a Ziploc bag. They turned out so great that I decided to give it a try at home with L. I wasn't sure how she'd like this one, sans mess and all, but she really enjoyed the whole process and the paintings turned out really cool.


I slid a piece of paper into a Ziploc bag and squeezed in a bit of red and a bit of yellow. Autumn colors, yes, and also primary colors that ended up mixing to create another lovely autumn hue - orange!


At first, L wasn't really sure what to make of this sandwich bag glob of paint in front of her. Once she touched that amazing squishy texture, however, she was won over in an instant!


She had us laughing so hard, as she kept looking at her hands for the mess! She definitely missed the opportunity to cover her body in paint, but she enjoyed herself all the same.


It was such fun to watch the yellow and red blend together to create orange. The leaves are finally starting to change in our area, so these colors have been a hot topic of conversation for us lately. Once she was finished, I very gently peeled the bag away from the paper and laid it out to dry. As a delightful bonus, the inside of the bag was a lovely work of art in itself, and it will look fantastic hanging in our front room window! Two for the price of one and nothing to clean up besides!

Thursday, September 27, 2012

{Playing Through Autumn Day 14} Autumn Lego Printing

One of the best things about seasonal art projects, I think, is that you can take something you'd do any day of the year and sneak in those seasonal colors to make the activity match the season. This was the case recently when L and I did some Lego printing using autumn colors.


For Lego printing, you simply press the top of the Lego into a blob of paint and then put it to paper. It ends up looking pretty cool. In fact, I had to join L on this activity because she made it look so fun!


As per my usual, I talked with L about red, yellow, and orange being colors we see in the fall. She just loved slamming the Legos onto her paper!

Mommy's final work:
(I thought the prints ended up looking like leaves swirling in the air. My husband quickly pointed out that, in fact, they looked like uniform circles in fall colors. Everybody's a critic!)


L's final work:
("Now THAT," says Dad, "is an autumn picture!" Could you share some of that encouragement over in this direction, honey?)


At any rate, this was a lot of fun. I have to hand it to L, she certainly knows how to make a painting glow!

Monday, September 10, 2012

{Playing Through Autumn Day 3} Painting with a Leaf

The "fall" part of autumn is upon us a little early this year in our area, as we have had nearly no rain all summer long. I'm a bit bummed by this, as I fear we won't see many leaves changing color this year. While that has me saddened, we do have an abundance of gorgeous crunchy leaves already littering the ground nearly everywhere we go. L has had a lot of enthusiasm for collecting these leaves, and I've been very encouraging in her venture. She really surprised me recently though, we she suggested we paint with one of the leaves she found. (Gasp! Perhaps my habit of presenting her with non-conventional art tools is rubbing off on her!) Anyway, I was ecstatic about her suggestion, so we got right to work using a leaf as a paintbrush.


We used brown and red paint on yellow paper (of course!) to work on this masterpiece. L thought the whole thing was really cool and I loved how self-initiated it was on her part.


The leaf was pretty dry, so a lot of it ended up crackling off and sticking to the paper courtesy of the paint. However, once the painting dried, it ended up having a really cool and unexpected textured look. L was so proud she couldn't wait to get it hung up in her play room!


Perhaps I'm biased as the mother of the artist, but I thought it turned out looking really awesome! Doesn't it just put you in the mind of leaves blowing on the wind?

Tuesday, September 4, 2012

Cardboard Tube Painting

I love presenting L with art activities that employ materials not traditionally used for creative purposes. I do this because I hope to instill in her a love of creativity and seeing things beyond what they are. As a preschool teacher, I generally never throw away an empty cardboard tube - be it from toilet paper, paper towels, cling wrap, what have you - so I decided to use one with L for a painting activity. So easy! We simply dipped the end of the tube in the paint and let the creative sparks fly!


This activity was great in the sense that we got to play with messy paint, but L also really enjoyed thwacking the cardboard tube onto the paper. Very satisfying from both standpoints!


We now have some pretty fantastic art hanging in our playroom, all because of a simple cardboard tube. What unconventional art tools have you tried with your kiddos?


Wednesday, August 22, 2012

The Magic of Dry Erase

Recently we found ourselves in the pediatrician's office, getting L checked for an ear infection. (Seriously?! I breastfed! My kid is supposed to be immune to those things!) Anyway, while we were waiting for the doc to arrive, we began to doodle on a dry erase board in the exam room. It was an AMAZING way to pass the time! L loved it and it totally took her mind of her (should-be-non-existent) ear pain. It was fantastic!

When we got home later that afternoon, I pulled out a rather large dry erase board I had purchased some months before with the motivation of getting organized. (You'll notice I said nothing about having to take it off a wall somewhere.) L instantly recognized what it was, and was so eager to start doodling again that she could barely contain herself. Needless to say, my child is now an expert at the magic that is the dry erase board, and I have another tool in my repertoire for helping her learn through play. Huzzah!


We wrote and erased letters (okay, mostly I wrote and she erased), shapes, doodles, the names of our family and friends, numbers, all sorts of things. It was so engaging and so much FUN. We even traced a few items from the play room, which I loved because it showed L how you can integrate all kinds of stuff into your artwork. It was a blast!


What kind of non-toy toys are your wee ones digging these days?

Monday, August 20, 2012

Car Wheel Paint Prints

During my many years in the early childhood field, I've seen and done some pretty amazing art projects with wee ones. One of my all time faves is one of the simpler things I've tried: painting with the wheels of toy vehicles. L has had a big interest in vehicles for the past several months, so I decided to rustle up a big piece of cardboard for a canvas and let her give it a try.


I put some paint into a pie tin and with just one quick model to show L how the thing was done, she was off and running (driving?) and making some really visually interesting art in the process.


She did a pretty fantastic job of covering the entire piece of cardboard with the wheel prints, and I now have a pretty bitchin' piece of artwork that I plan to frame (seriously!) and hang in our living room.


What unconventional art tools have your kiddos tried?


Wednesday, August 8, 2012

Cotton Ball Painting

In my never-ending quest to present L with art activities that are varied and novel, I've thrown together some interesting things, but we recently experienced a new painting tool that was somehow more delightful than anything we've done for a while: cotton balls. I don't know what it was, exactly, that made this activity so engaging for my very busy girl, but we painted on and on with just a bit of tempera paint and a handful of cotton balls. Perhaps the mood was just so, but we managed to work our way through three pieces of paper, which in the land of Todd is really saying something.


Whatever it was, the cotton or the mood, L loved this activity, as did her dad and I. For me, there was just something so satisfying about the squish of wet cotton on the paper. L, for her part, managed to get through one entire piece of paper before sticking both hands in the pie tin, and that is REALLY saying something!


As the process moved forward, L, Dad, and I all ended up working on the same sheet of paper. The collaborative nature of the thing made it all the more fun, and it was wonderful to spend such quality time bonding over a shared piece of artwork.


Thursday, August 2, 2012

Old Becomes New: Bundled Markers

One of the easiest ways to breathe new life into an activity that a kid has done again and again is to present it in a new way. For your artistic pleasure, I present bundled markers! I bundled markers into groups of three and tied them with a hair tie. Lots of fun that literally took 20 seconds to create!


Wednesday, July 18, 2012

Golf Ball Painting (Sort Of)

The method is pretty easy: take a shallow container (I used a plastic tote), line it with heavy paper, dip a golf ball in tempera paint, throw it in the tote, and let the rolling fun begin. You're left with an awesome work of art with groovy lines and textures and colors. Or so I thought when I presented this art activity to L. You see, I once did this activity with the kindergarten class I'd been teaching and it was a huge hit.  But for a toddler like L, there were much more satisfying things to do with than paint-covered golf ball that roll it around in a shallow tote.


For starters, L was much more interested in propelling the golf ball around the bin herself. I actually loved this because it was excellent fine motor practice and she had more control of her art experience.


After experimenting with that for a bit, she decided it was way more fun to smear large globs of paint around with her hands. Again, I thought this was fantastic (love a girl who controls her own destiny!) and also it was hilarious for those of us watching this whole shebang.

Of course, when have we ever gotten through an art activity without at least some amount of paint ending up all over L's appendages? Never!


Eventually, she did decide to give the whole rolling-the-golf-ball thing a try, and it turns out she was a master of that skill in no time. She laughed riotously every time the ball banged against the side of the tote. 


We ended up with some pretty cool designs, and the most important thing is that L experimented with art and had a good time. It's always so funny to see your own plans thrown out the window by a wee one...you just never know what can happen!